
I’ve been so excited to knit up a pair of my favorite slipper socks to attach to my Biscotte Yarns Sole To Knit! There’s nothing like homemade things. And slippers are definitely a must for the winter season.
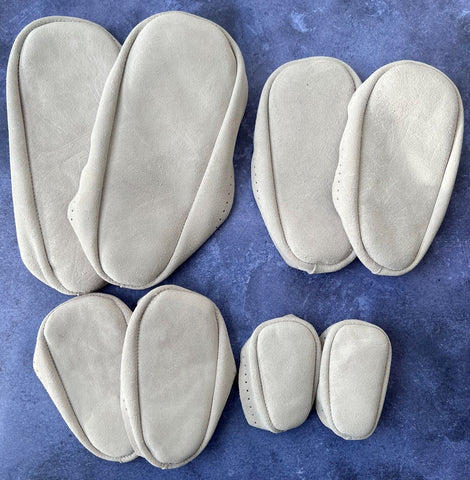
I have a tendency to wear out a pair of slippers within a very short period of time, so this year I decided that they need to have these amazing soles attached to give them extra durability. These soles are fantastic not only because they are soft and warm but they also have pre-punched holes around the edge which will make the sewing part easier and more precise therefore giving them a handmade look instead of homemade. Since they are made with suede bottoms there's no worries about slipping while wearing these!
The pattern is very easy and absolutely beautiful. They feature a wide Garter Stitch cuff that is folded down with an attached Icord and pom poms, along with adorable cabled owls on the outside portion of the legs. I’ve knit these up in the past and received so many compliments on them. So, I want to share this special pattern with you and hope that you will enjoy them as much as I do. The cabled owls show up much better on a background of Reverse Stockinette Stitch, however I knit them in Stockinette Stitch just because it's easier. You could knit a small background of Reverse Stockinette around the owls if you really want your owls to pop out!
To knit these slippers you will need a bulky weight yarn, stitch markers, cable needle, tapestry needle and buttons for the owl eyes. I'm using Cascade Eco in Taupe. It has 482 yards of yarn so one skein is enough to knit a pair of slipper socks. To choose a bulky weight yarn check out the options HERE. I'm using a 4mm circular needle with a 9 inch cord from Chiaogoo, which is absolutely fantastic! I prefer to knit on circulars and since discovering these little gems I even use them to knit sleeves of sweaters. My gauge for this yarn on 4mm needles was 20 stitches over 4 inches. My shoe size is an 8 and I usually wear a medium in slippers for your reference. To make a smaller or larger size I simply suggest going either down or up in needle size. The foot is easily adjusted by knitting a shorter or longer length. Ok! Let's get started!!
DOWNLOAD PDF PRINTER-FRIENDLY PATTERN IS HERE: OWL-TASTIC SLIPPER SOCK
Start by loosely casting on 40 stitches using the long tail cast on method. Careful not to twist your stitches, add a stitch marker and join to knit in the round if you are knitting on circulars. If you are knitting on double pointed needles,evenly distribute your stitches over 3 or 4 needles and join to knit in the round. If using double pointed needles a stitch marker is not necessary as you can use the tail to know where the round starts.
Knit in Garter Stitch for approximately 5 inches. To knit Garter Stitch in the round you will knit one round followed by a purl round. After reaching 5 inches or the desired length, ending with a purl round, work an increase round as follows:
K5, M1L; repeat to the end. (8 stitches have been increased) To M1L (make1 left) insert the tip of your left needle into the horizontal bar between the 2 stitches from front to back and then knit into the back of the stitch. You will now have 48 stitches on your needles.
Knit in Stockinette Stitch (knit all rounds) for 1.5 inches. On the next round stitch markers are placed for the pattern repeats. For the RIGHT slipper sock, slip the beginning of round marker, knit 4 stitches, place a marker, knit 8 stitches, place a marker (this 8 stitches is for the first owl), knit 4 stitches, place a marker, knit 8 stitches and place the last marker ( this second set of 8 stitches is for the second owl). After all, I couldn't only make one owl...He might get lonely;)
The owl is worked over 8 stitches and 18 rounds. Work the following pattern within the 2 sets of markers that contain the 8 stitches. All other stitches will be knit.
Round 1: C4F (Place 2 stitches on a cable needle and hold to the front, knit 2 stitches, then knit the 2 stitches from the cable needle), C4B (Place 2 stitches on a cable needle and hold to the back, knit 2 stitches, then knit the 2 stitches from the cable needle.
Rounds 2, 3 and 4: Knit all stitches.
Round 5: Repeat round 1.
Rounds 6 and 7: Knit all stitches.
Round 8: Knit 2, purl 4, knit 2
Round 9: Knit all stitches.
Rounds 10 to 15: Repeat rounds 8 and 9 three more times.
Rounds 16, 17 and 18: knit all stitches.
The owl pattern has been complete!! It's up to you if you would like to repeat the 18 rounds more than once or leave it with just one set of owls. I've decided to repeat one more time! When the repeats of the pattern are complete the stitch markers can be removed, except for the beginning of round marker.

When you have reached your desired leg length it's time to start the heel flap which is worked back and forth over half of the total stitches. Remember that the owls are supposed to be on the outer portion of the leg when dividing the stitches. Whether knitting in the round or on double pointed needles start at the beginning of the round and knit 36 stitches. Then place the next 24 stitches on a separate needle which will now be ready to start the heel flap on the right side. The remaining 24 stitches of the instep can be placed on yarn of contrasting color or stitch holders.
To knit the heel flap repeat the following 2 rows until approximately 2 inches from the start.
Row 1: Slip 1 purlwise, knit 1; repeat to the end of the row.
Row 2: Slip 1 purlwise, purl to the end of the row.
When you have reached the desired length, ending on a wrong side row, it's time to turn the heel!
Row 1: Knit 13, ssk (slip one as if to knit, slip one as if to knit, then knit together through the front loops), knit 1 and turn your work.
Row 2: Slip 1 purlwise, purl 4, p2tog (purl 2 together), purl 1 and turn your work.
Row 3: Slip 1 purlwise, knit 5, ssk, knit 1, turn work.
Row 4: Slip 1 purlwise, purl 6, p2tog, purl 1, turn work.
Row 5: Slip 1 purlwise, knit 7, ssk, knit 1, turn work.
Row 6: Slip 1 purlwise, purl 8, p2tog, purl 1, turn work.
Row 7: Slip 1 purlwise, knit 9, ssk, knit 1, turn work.
Row 8: Slip 1 purlwise, purl 10, p2tog, purl 1, turn work.
Row 9: Slip 1 purlwise, knit 11, ssk, knit 1, turn work.
Row 10: Slip 1 purlwise, purl 12, p2tog and turn work.
Now ready for a right side row it's time to start the gusset. Knit across the 14 stitches of the heel and then pick up a stitch in every row along the side of the heel flap. The sample that was knit had 12 stitches picked up; anywhere from 12 to 14 stitches is perfectly fine. Then knit across the 24 instep stitches, and pick up the same amount of stitches on the other side of the heel flap. If working on circular needles, place stitch markers on either side of the 24 instep stitches. If working on double points, place the 24 instep stitches on a separate needle.
Round 1: knit to 3 stitches before the instep, k2tog (knit 2 stitches together), knit 1, knit across the 24 instep stitches, knit 1, ssk, knit to beginning of round. (2 Stitches decreased)
Round 2: knit all stitches.
Repeat these 2 rounds until you are back to your original stitch count which is 48 if following the sample.
When back to the original stitch count, knit the foot length to approximately 2 inches before the overall desired length. If unsure of the length, try on your slipper sock as you go to ensure you get a good fit! When the desired length is reached, it's time to start decreasing for the toe. The set up will be the same as it was when decreasing for the heel.
Row 1: Knit to 3 stitches before the instep, k2tog, k2, ssk, knit to the last 3 stitches of the instep, k2tog, knit 2, ssk, knit to beginning of round. (4 stitches decreased)
Row 2: Knit all stitches.
Repeat these 2 rounds until there are 20 stitches remaining. Close the toe using the Kitchener Grafting method, the 3 Needle Bind Off or a similar bind off method of your choice. Weave in the ends and block the first slipper sock while knitting up the second and then the real fun begins!!
The LEFT slipper sock is knit the same as the first with the exception of the stitch marker placement for the cabled owl design. The stitch marker placement is as follows: knit 24 stitches, place marker, knit 8 stitches, place marker (this 8 stitches is for the first owl), knit 4 stitches place marker, knit 8 stitches, place marker (this 8 stitches is for the second owl) and then knit the last 4 stitches to the beginning of the round. Other than the placement of the owls follow the same instructions for the left slipper.

Here is one slipper sock complete without the soles added. I added little buttons for the eyes of the owls, the Icord is weaved in through the Garter cuff with the absolutely ADORABLE pom poms tied on the ends!!
To knit an Icord, cast on 3 stitches on a double pointed needle. Instead of turning your work around just slide the 3 stitches to the other end of your needle and knit the 3 stitches. Again, without turning your work, slide the 3 stitches to the other end of your needle. The working yarn will be in the back and pulled across the back of the stitches as you knit them. Continue to do this until your Icord is long enough to tie around your leg in a bow where the Garter cuff will be. Do not cut the ends of the Icord as this is what we will use to tie on the pom poms.

To make a pom pom wrap your yarn around 3 or 4 fingers 40- 45 times, then tie a piece of yarn tightly around it. Cut the loops on the sides to reveal a hot mess LOL

Start trimming the pom pom until you are happy with how it looks. My previous life as a hairdresser comes out in me and I can get very picky. It's kind of like giving the pom pom a buzz cut! Be sure not to cut the tail yarn as we will tie it to the tail of the Icord after weaving it through the Garter cuff of our slipper socks!

Weave the tail of the Icord through your tapestry needle and then pull it in and out through 1 inch sections of the Garter cuff. It might be a little hard to pull it through but just a little wiggle and tug and it'll go through. When the Icord is weaved in through the cuff then tie the pom poms to the Icord. OH SO CUTE!!
Ok! So I tried a couple of ways to sew the soles onto my slippers and I found putting the slipper on and sewing it while it was on my foot the best way to do it. If you put your hand in, the slipper isn't the shape of your foot and therefore the sole is a little harder to get on really even.

My foot is in the slipper and I went around the whole slipper twice in every second hole slanting the strand so the next round I will sew into the hole I skipped to make a cross stitch.

To do this, insert the needle into the same spot that the yarn was sewn into from the previous round and then up through the skipped hole. I also did this round a second time to ensure the sole was attached really well. And it looked really nice with a bulky cross stitch around the sole.
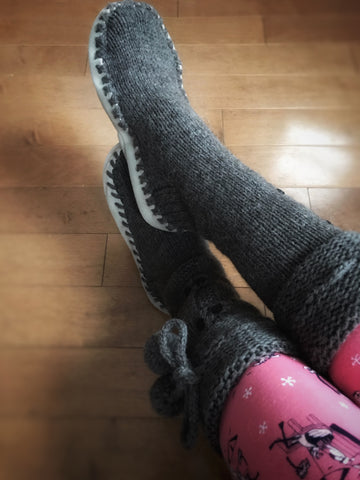
And here they are!! SOOOOO cozy and comfy and I'm already in my jammies! I hope you will knit these up and enjoy them as much as I do! Have you ever added soles to your slippers?
