
Do you know what's nicer than a regular ribbed collar?? A DOUBLE-KNIT COLLAR!! I remember years ago I knit this beautiful sweater and it had a double-knit funnel style neck. I loved it! It was so cozy and looked amazing because there was no bind off or cast on edge visible. The right and wrong sides were knit at the same time and it wasn't hard to follow, HOWEVER I've found a way that is so much easier that I want to double-knit every collar!
First, you start off with a provisional cast on. PLEASE do not let that make you run in the opposite direction as it used to for me. The crochet chain method for the provisional cast on is so easy! And you don't need to know how to crochet to make a chain.
PROVISIONAL CAST ON IN THE ROUND USING A CROCHET CHAIN

Step 1: I use a yarn that is a little thicker than the yarn I'm knitting my project with as well as a larger crochet hook than my needle size. I'm knitting with sport weight and my crochet chain is DK weight and of a contrasting colour. For your reference, the yarn I'm knitting with is one of my new favorite colours from Biscotte Yarns called Bisque. It's the most absolute perfect baby pink!! It was love at first sight. The yarn is La Douce MCN (Merino, Cashmere and Nylon).....need I say more?? This yarn is scrumptious! For the crochet chain I'm using Dk Pure in Lagoon. A colour I seem to choose over and over again! My needle size is 4mm and my crochet hook is 4.5mm. Start off by placing a slip knot on your crochet hook. This is the beginning of the chain.
Step 2: Yarn over your crochet hook and.....
Step 3: Pull the yarn through the loop and....
Step 4: VOILA!! You have completed one chain. Make around 10- 12 more chains than the cast on number of stitches in your pattern. I need to cast on 88 stitches, so I'll make around 98 chains.

Step 5: When you are finished with your chains, cut the end leaving a little tail and pull through the loop to secure it in place. This is the end of the chain.
Step 6: On the right side the chain looks like little "V" stitches. We will be working on...
Step 7: The back of the chain looks like dashes or purl bumps. We will be knitting into the dashes.
Step 8: Start at the beginning of the chain, insert your needle into the horizontal bar, lay your working yarn over it and pull through.

Step 9: Continue to work across the chain, picking up and knitting stitches.
Step 10: Make sure not to twist the chain or skip any little horizontal bars.
Step 11: When all your stitches have been cast on, make sure your chain is not twisted the same as you would ensure your stitches are not twisted with any cast on.
Step 12: Place a marker and start knitting in the round according to your pattern. The first stitch will be fairly loose; I hold the end of my crochet chain and the tail of my yarn snuggly as I knit the first few stitches to avoid creating any unwanted ladders.
At this point, knit your collar in the ribbing your pattern calls for until you have reached the required length. I like to knit the collar at least 3 inches before starting to join it to the provisional cast on.
KNITTING THE EDGES OF THE COLLAR TOGETHER
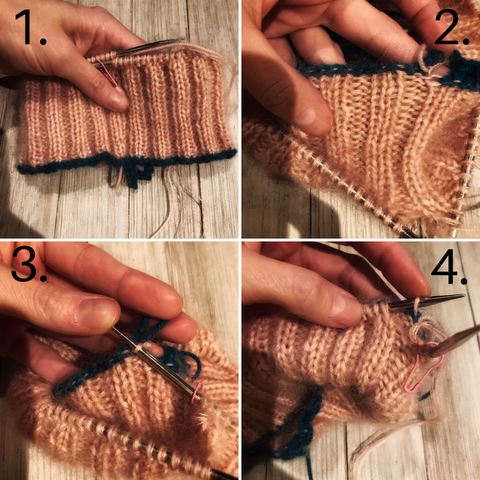
Step 1: Happy with the length of the collar, I'm ready to fold it over! I like my collar to be around 1.5 - 2 inches in length after it's doubled over.
Step 2: If you look on the inside of the collar at the back of the chain you will see little pink horizontal bars. These are the back of the stitches that we will knit into.
Step 3: To see the horizontal bar a little better, I've inserted the tip of the right needle into it.
Step 4: Make sure to find the first horizontal bar when ready to start joining the edges together. It's not hard to see because it's right where the end of the chain is. Insert the tip of your left hand needle into the stitch (the horizontal bar) and place it on your needle.

Step 5: Knit the stitch you picked up together with the next stitch on your needle as a k2tog.
Step 6: Continue picking up the horizontal bars, placing them up on your left hand needle and knitting them with the next stitch. Be careful not to skip any of the stitches in your crochet chain.
Step 7: When you have reached the end of round, back to your marker, you can pull out the slip knot (end of your chain, not the beginning) and unravel the chain.
Step 8: Voila!! The chain is out and the collar is doubled up!! It looks amazing and it's so cozy! After the chain has been removed you are now ready to continue knitting your sweater top down the same as you would after finishing a regular ribbed collar. So you can easily incorporate this double knit collar into any pattern that is top down. Follow your patterns cast on and ribbing pattern instructions, just knit double the length, follow the instructions above and then continue on to the next step in your pattern!
As you can see this technique is super easy and so worth it! There's no cast on or bind off edge visible and it looks so tidy! I absolutely love the look of this collar
 This style of collar is fantastic if making a cardigan with a high collar that you want to stand up. I've knit cardigans in the past with the hopes of the collar standing up, but when knit as one layer it has a tendency to want to lie down. I will eventually get around to making a cardigan using this technique.
Do you like double knit collars? Do you have a favorite way to knit them??